
Getting Started - Securing the Root Account
#Best Practice
It's the first time logging on to AWS, before going off half-cocked deploying a dozen EC2 instances, the Root account requires securing, this prevents it from falling into the wrong hands. Update your browser if it's not already updated, Chrome had 17 RCE's for 2021.
The statement below is lifted directly from the AWS site. It appears utilizing the root account for day-to-day operations, which includes access to billing and the ability to destroy your AWS subscription is bad.
Important
We strongly recommend that you do not use the root user for your everyday tasks, even the administrative ones. Instead, adhere to the best practice of using the root user only to create your first IAM user. Then securely lock away the root user credentials and use them to perform only a few account and service management tasks. To view the tasks that require you to sign in as the root user, see AWS Tasks That Require Root User. For a tutorial on how to set up an administrator for daily use, see Creating your first IAM admin user and user group.
Following AWS best practices this article describes setting MFA, Password Policy and Creating a Delegated IAM User. Items not covered within this article are changing the Root accounts password, it's just been set. Deleting 'Access Keys' as these weren't created during the account creation process, will also be skipped.
Further Reading
Tasks Requiring Root (here)
Security Best Practice (here)
Creating your first IAM User (here)
Pre-configured Job Functions aka Roles (here)
#Lets Secure Root with MFA
Whilst logged on to the AWS Console as Root click 'Services' and browse to 'Security, Identity, & Compliance' or type 'IAM' in the Search.
Click on 'IAM'.

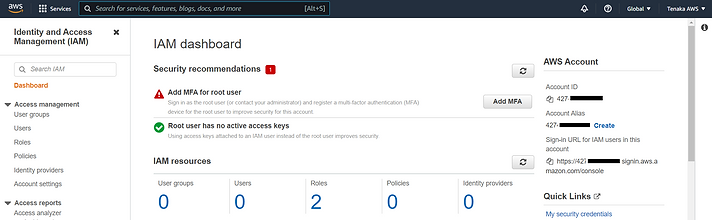
#IAM Dashboard
Review any recommendations, as this is a new instance there's no active access keys but MFA for the Root User requires setting.
Top right click on the account name, mines 'Tenaka AWS' or on the Quick Links and then 'My Security Credentials'.
Clicking on the account name requires the 'Security Credentials' to be selected.

#MFA
On the 'Multi-Factor Authentication (MFA)' drop down select 'Activate MFA'.

At this point Google Authenticator or another MFA application is required.
Select 'Virtual MFA device'.

Follow the on-screen instructions and use the phones camera and Google Authenticator App to scan the QR Code.
The Authenticator App on the mobile will start cycling through 6 digit numbers every 60 seconds or so.
Enter the first code from the Authenticator App in the MFA Code 1, wait until the code cycles and enter the 2nd code in the MFA Code 2 box. This is off screen.
Click on the 'Assign MFA' button.

That's MFA complete, click on the 'Close' button.

#Password Policy
From the IAM Dashboard, select 'Account Settings' to update the password policy.

The default password policy is sub-optimal.
As a wearer of a tin hat and more importantly a user of keypass the policy requirements can be set fairly high.

Set a policy that either matches the Corporate policy or what your willing to live with.

#Create a IAM User
From the IAM Dashboard select 'Users' and then 'Add Users' on the far right.

#PowerUser but the documentation says Administrator
The AWS documentation states that Root should be delegated to an account with Administrative access. Its better to start with a more restrictive account and increase the permissions, than provide sudo god rights.
To that end the first account will be a 'PowerUser'. PowerUser contains most of the permissions of an Administrator but is unable to manage users, groups, password policy. As this is my day to day account with little or no account management PowerUsers is ideal.
How hard can it be........
Warning:
If you decide to deploy a Power User and not Administrator Access account, additional steps when deploying services such as a EC2 Virtual Machine are required.
PowerUser doesn't contain the permissions to either view IAM Roles or create IAM Roles. Root Access will be required to perform the IAM functions. PowerUser will also require IAMReadOnlyAccess to assign a IAM Role during EC2 provisioning.
Continuing with the saga of delegation the PassRole capability requires settings, this is not a permission but an ability to elevate to IAMReadOnlyAccess requiring a custom Policy.
#Root is required for the following tasks:
-
Change your account settings. This includes the account name, email address, root user password, and root user access keys. Other account settings, such as contact information, payment currency preference, and Regions, do not require root user credentials.
-
Restore IAM user permissions. If the only IAM administrator accidentally revokes their own permissions, you can sign in as the root user to edit policies and restore those permissions.
-
Activate IAM access to the Billing and Cost Management console.
-
View certain tax invoices. An IAM user with the aws-portal:ViewBilling permission can view and download VAT invoices from AWS Europe, but not AWS Inc or Amazon Internet Services Pvt. Ltd (AISPL).
-
Change your AWS Support plan or Cancel your AWS Support plan. For more information, see IAM for AWS Support.
-
Register as a seller in the Reserved Instance Marketplace.
-
Configure MFA delete for your S3 bucket.
-
Edit or delete an Amazon S3 bucket policy that includes an invalid VPC ID or VPC endpoint ID.
Add an account name, Password for Console access etc.....

Click on 'Create Group'.

Add a Group Name.
Enter 'poweruseraccess' in the Filter Policy, then select the 'PowerUserAccess' group.
Click on 'Select Group'.
Note: Based on the previous warning regarding listing IAM Roles for EC2 creation add the 'IAMReadOnlyAccess' in addition to 'PowerUserAccess'.

Select on 'Next: Tags'.

Select on 'Next: Review'.

Review the account and finally click on 'Create User'.

Record the temporary password by selecting '******Show', close.

Click on the user name 'PowerUser'.

Select 'Security Credentials' and click on 'Manage' for Assign MFA Device.

As with setting MFA for the Root, the process is the same for the PowerUser.
Select 'Virtual MFA Device'.

Follow the on-screen instructions and use the phones camera and Google Authenticator App to scan the QR Code.
The Authenticator App on the mobile will start cycling through 6 digit numbers every 60 seconds or so.
Enter the first code from the Authenticator App in the MFA Code 1, wait until the code cycles and enter the 2nd code in the MFA Code 2 box. This is off screen.
Click on the 'Assign MFA' button.

Logout at Root and then click the Sign-in on the AWS site.
Select 'IAM User' and enter your email address.
Warning, this screen maybe slightly different, it may request the Account ID.

Enter the MFA Code from the Google Authenticator App.

Enter the Account ID.

Change the password, not forgetting to consider the password policy set earlier.

That's it for securing Root and creating a delegated account for day to day operations.