
Getting Started - AWS EC2 Virtual Machine
#The Process of Creating an EC2 VM with PowerUser
During the process of securing the Root User, a PowerUser account was commissioned. This goes against the AWS documentation that states an account with Administrative access should be used. But a day-to-day management account with Sudo god rights and the ability to manage users and policy doesn't seem that much of a benefit over Root.
I know going off-piste will generate some extra work and issues to work through.
This article works through the issues of deploying an EC2 Windows virtual machine with PowerUser access. It's the journey and not the destination that's of interest.
#Start with PowerUser, what's broken...
Logon to the AWS Management Console as PowerUser account.
Search and then select 'EC2'.

Select 'Launch Instance' drop down and then click on 'Launch Instance'.

Scroll down the list of Amazon Machine Images (AMI) and 'Select' the MS Windows Server 2019 Base. If Linux is preferable then select a Linux variant of your choice.

Select the Free-Tier option.

The first issue, at 'Configure Instance' there's no permission to select or create an IAM Role.

To prevent the constant flip-flopping between PowerUser and Root, especially with the MFA codes enabled. Open an additional browser and login as the Root user. PowerUser will be logged on via Chrome and Root will use Edge.
As Root, open IAM from the AWS Management Console.
Click on users and select PowerUser.

On the Permissions tab, 'Add Permissions'.

Click on 'Create Group', search for 'IAMReadOnlyAccess' role and add to the new group name as IAM-ReadOnly.

A IAM Role for the EC2 virtual machine requires defining, whilst we're here.....
Select 'Roles' under Access Management and then click on 'Create Role'.

Select 'AWS Service' and EC2 from the User Common Use Cases.

Search for 'ec2' under Permissions Policies.
Select 'AmazonEC2FullAccess'.
Scroll to the bottom of the page to continue.

Provide a role name, mines 'Role-EC2Windows'.

Switch back to PowerUser in the Chrome instance.
Cancel the existing EC2 provisioning, a new EC2 instance requires launching.
From EC2 Dashboard, select 'Launch Instance' drop down and then click on 'Launch Instance'.
Scroll down the list of Amazon Machine Images (AMI) and 'Select' the MS Windows Server 2019 Base. If Linux is preferable then select a Linux variant of your choice.
Select the Free-Tier option.
The IAM Role issue have been resolved, on the drop-down select the new role 'Role-EC2Windows'.

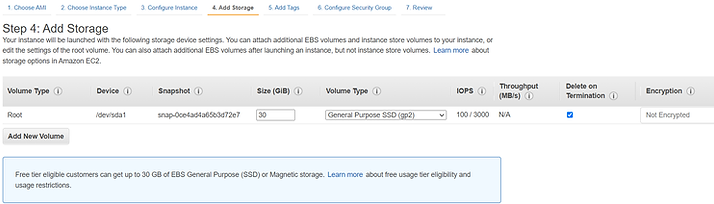
Take the defaults for Add Storage.
Skip adding any tags.

From the Chrome Browser, Google 'whats my ip'.
Update the RDP's source firewall with your IP. Remove the last IP octet, replace it with a '0' (zero) and add a 24 subnet mask.
Leaving the RDP port 3389 accessible to all addresses on the Internet is asking for trouble.
Click 'Add Rule' and select the HTTP, leaving the source as all zero's.
Note: To prevent RDP from being exposed to the Internet connection via AWS Systems Manager Agent (SSM Agent) instead, it's pre-installed on all AWS AMI images. However, I've some content on my laptop I wish to copy directly to the Windows image in preparation for the next article.

Review the settings

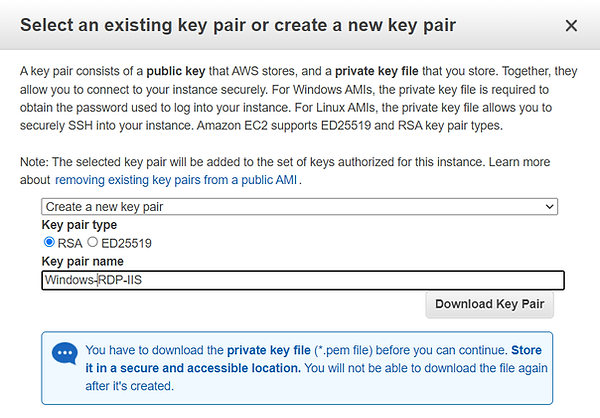
Create a new key pair with RSA, ED25519 doesn't support Windows.
Download Key Pair, this is required for accessing the Windows administrator's password later on.
Another failure, right at the end, the error message is encoded....... marvellous.
Copy the error message to clipboard (Ctrl+C).
Cancel the deployment.

Switch back to Edge and the Root user.
From the AWS Management Console type 'cli' and select 'CloudShell'.
Wait whilst CloudShell loads can take a minute or so.
Type:
aws sts decode-authorization-message --encoded-message <paste error here>
The output is as follows, the cause for the failure is highlighted in red.
"DecodedMessage": "{\"allowed\":false,\"explicitDeny\":false,\"matchedStatements\":{\"items\":[]},\"failures\":{\"items\":[]},\"context\":{\"principal\":\"id\":\"AIDAWHCAK2CUOBK3JOE3T\",\"name\":\"PowerUser\",\"arn\":\"arn:aws:iam::42741111111:user/PowerUser\"},\"action\":\"iam:PassRole\",\"resource\":\"arn:aws:iam::42741111111:role/EC2-WindowsRole\",\"conditions\":{\"items\":
PassRole is the ability to pass the policy and permissions delegated to that user. The PowerUser does not have the ability to pass the IAMReadOnlyAccess policy despite being listed as a permission.
The resolution is as follows:

Open IAM and browse to 'Roles', select and click on 'Role-EC2Windows'.
Copy the ARN string 'arn:aws:iam::42741111111:role/Role-EC2Windows'. to a text editor.

Browse to 'Policies', search and click on 'IAMReadOnlyAccess'.

On the Permission tab, select { }JSON
Copy the entire json string to a text editor.

Browse to 'Policies' from within IAM and click on 'Create Policy'.
Select the JSON tab in the Create Policy Wizard.
Paste in the json code from IAMReadOnlyAccess copied earlier.
Add in the iam:GetRole and iam:PassRole lines.
On the resource line remove the wildcard '*' and paste in the ARN for 'Role-EC2Windows.
Completed snippet below:
{
"Version": "2012-10-17",
"Statement": [
{
"Effect": "Allow",
"Action": [
"iam:GenerateCredentialReport",
"iam:GenerateServiceLastAccessedDetails",
"iam:Get*",
"iam:List*",
"iam:GetRole",
"iam:PassRole",
"iam:SimulateCustomPolicy",
"iam:SimulatePrincipalPolicy"
],
"Resource": "arn:aws:iam::42741111111:role/Role-EC2Windows"
}
]
}
Note: The resource string defaults to a wildcard allowing the iam:PassRole permissions on all resources....sub-optimal.

Name the policy and complete the wizard.

Within 'Policies' the new custom policy is listed.

Browse to 'Users' and select the PowerUser, 'Add Permission' and select 'Attach existing policies directly'
Search for 'iamread'
Select and add 'IAMReadOnly-EC2Windows'.

Review the permissions. PowerUser lists both 'IAMReadOnlyAccess' and 'IAMReadOnlyAccess-EC2Windows'.

Let's try again....
Switch back to PowerUser in the Chrome instance.
Cancel the existing EC2 provisioning, a new EC2 instance requires launching.
From EC2 Dashboard, select 'Launch Instance' drop down and then click on 'Launch Instance'.
Scroll down the list of Amazon Machine Images (AMI) and 'Select' the MS Windows Server 2019 Base. If Linux is preferable then select a Linux variant of your choice.
Select the Free-Tier option.
The IAM Role issue has been resolved, on the drop-down select the new role 'Role-EC2Windows'.
Take the defaults for Add Storage.
Skip adding any tags.
Configure Security Group, select 'Create a New Security Group'.
Rename the Security Group Name and Description with something a bit more meaningful.
From the Chrome Browser, Google 'whats my ip'.
Update the RDP's source firewall with your IP. Remove the last IP octet, replace it with a '0' (zero) and add a 24 subnet mask.
Leaving the RDP port 3389 accessible to all addresses on the Internet is asking for trouble.
Click 'Add Rule' and select the HTTP, leaving the source as all zero's.
Review the settings
Select the previous created RSA Key Pair.
Excellent, no errors and the Windows EC2 instance is being provisioned.

Return to the EC2 Dashboard and select 'Instances', click on the new instance.
Click on 'Connect'.

Select 'RDP Client'.
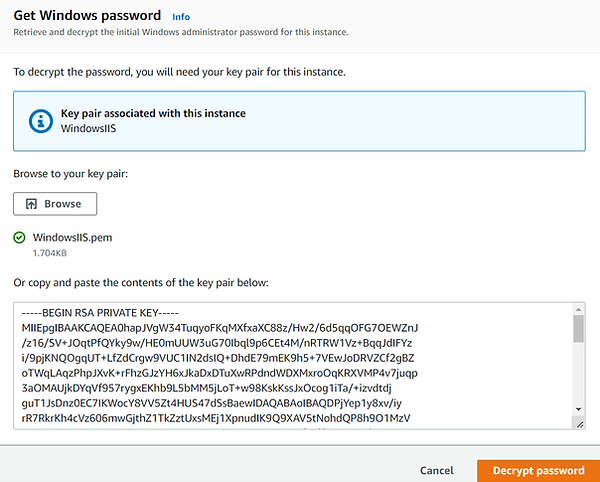
Click on 'Get Password'.

Browse to the saved key pair created during the EC2 vm provisioning.
Click on 'Decrypt Password'.
Back on the 'Connect to Instance', select 'Download Remote Desktop File' and open once downloaded.
Copy the supplied password and paste in to the password box within the MSTSC window.

All done, Windows Server is now accessible over RDP from AWS.
The firewall for port 3389 will only allow 254 IP's from your surrounding area, protecting the server from nearly all of the Internet. However, if your home IP changes to an IP outside the subnet specified the firewall rule will require updating.
The plan for the next article is to install a web server, create an Auto Scaling Group and for the instances to be Elastic Load Balanced.

Don't forget to either 'Terminate' or 'Stop Instance' to prevent any costs being incurred.
As always thanks for taking the time reading this article.