Pi Zero as a HID \ USB Device (P4wnP1 A.L.A.O)

Human Interface Devices (HID) aka your Keyboard and Mouse are explicitly trusted by the OS, why not, what's the worse that can happen....what about typing out a script at 1000 words per minute, then mounting it as a USB storage device and downloading your documents in as little as 2 minutes or worse. This is exactly what will be covered using a Pi Zero and P4wnP1 alao by Rogan Dawes.
Here's the link to download the pi zero image based on Kali and what features alao is capable of.
Aloa isn't capable of performing 'LockPicker', this was possible in the previous version. Lockpicker uses Responder to capture the user's password hash, hand it off to John and crack the password, finally using the keyboard to type in the password to the logon screen. The hardware is a Pi Zero, seriously, in reality only the weakest pre-known passwords would fall.
The following will be required:
Hardware:
Pi Zero W (wireless) from thepiehut.com for £9.30.
MakerHawk Raspberry Pi Zero W USB-A Add-on Board with case from Amazon for £7.00. (optional)
SanDisk Ultra 32 GB microSDHC Memory Card from Amazon for £5.99 - 16Gb will suffice.
Downloads:
P4wnP1 alao image (here).
Winrar for uncompressing the .zip or xz file (here).
Win32 Disk Imager to transfer the .img to the Micro-SD (here).
Download aloa and extract the .img using Winrar.

With Administrative rights open 'Win32 Disk Imager' and browse to the 'kali-linux-v0.1.1-beta-rpi0w-nexmon-p4wnp1-aloa.img'.
Insert the Micro-SD card in to the client and select the correct device.
Click 'Write'.
'OK' the success message.
The 'Format Disk' nag box will appear, click 'Cancel'

Remove Micro-SD and insert it into the Pi Zero.
The 2 micro USB ports offer different behaviours and IP's.
The port labelled 'Power' should be whilst configuring aloa. It won't present itself as a USB HID device and scripts won't execute. The admin page is served via the wifi at http://172.24.0.1:8000.
The port labelled 'USB Hub' acts as the HID device and is to be used when pillaging. It's possible to access the admin page via http://172.16.0.1:8000 its presented to the client as an active network device, no need to connect to the wifi.

'Power the Pi Zero and wait for 30 seconds.
The wifi SSID is pretty obvious, connect with the password of 'MaMe82-P4wnP1'.
Warning: Every time connecting to the SSID from my slightly tweaked client (aka hardened to within an inch of its life) the client would BSOD with a security exception.

Open your preferred browser, but not IE, it's rubbish, so Chrome or Edge.
Connect to 'http://172.24.0.1:8000/'.

Clear and concise instructions on how the admin page applies configurations are more miss than hit, so here are the basics on updating the WIFI SSID and adding HID scripts.
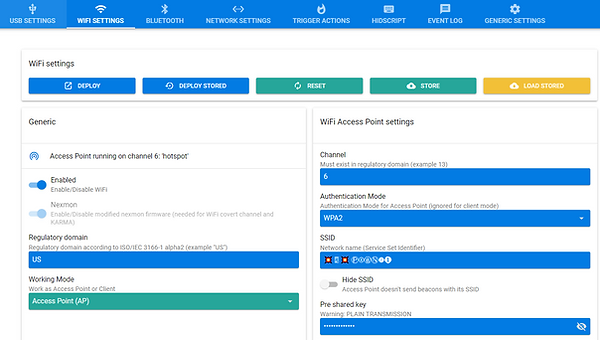
DEPLOY - Run the current configuration live as in 'now'.
DEPLOY STORED - Load and Run a previously saved configuration.
RESET - Reverse any changes back to the current template.
STORE - Save the current settings for later use.
LOAD STORED - List any stored configurations.
Pretty easy so far......each action links back to the 'TriggerActions Template' and 'Master Template'. Any changes are required to be saved to a Master Template and selected to run at startup.
Now a quick run-through of deploying a HID script followed by more detailed explanations.
-
Click on 'HID Script' and add some actions for the keyboard.
-
DEPLOY > Test the keyboard actions.
-
STORE > name something meaningful 'HID Script 1'.
-
Click on 'Trigger Actions' and create a new trigger action referencing 'HID Script 1'.
-
STORE > name the action trigger 'HID Trigger 1'.
-
Click on 'Generic Settings' and add 'HID Trigger 1' to 'TriggerActions Template'.
-
STORE > Saving as 'HID Template 1'.
-
Select 'HID Template 1' on the 'Startup Master Template'.
Now the process of updating and storing configuration is understood we can proceed with the changes without them being undone or reverted at every reboot.
To update the Wifi SSID, navigate to the 'Wifi Settings'.

Update the 'SSID' to something not so obvious and add a new 'Pre shared key'.

Click on 'STORE' to save.

Name the new config and click 'STORE'

Navigate to 'Generic Settings'

Select the new config from the 'Wifi Template'.
Click on 'STORE' to save the change.

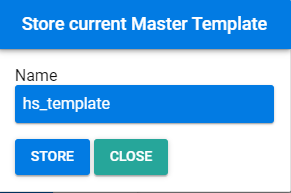
Name the new template and 'STORE'.

Under 'Startup Settings' change the 'Startup Master Template' to 'hs_template' and 'OK'.

If you wish to test click on 'DEPLOY', check your wifi and reconnect to the new SSID 'hostspot' with the new password.
Now to confirm it persists with a power cycle, either pull the pi zero or shutdown, re-insert and wait a few moments.

Connect to the 'hotspot' wifi and load the admin page at http://172.24.0.1:8000/.

With that change to the SSID the secure client is no longer 'Blue Bending' when establishing the connection.
The next update is to configure aloa to mount as a USB storage device and perform a HID injection action or attack.
Remember keyboards operates when the user is in front of the client and the HID injection attack operates under the same premise, the user must be logged on and the desktop unlocked. Unless you know the user's password at which point the aloa can be programmed to press 'Ctrl, Alt and Del' and then type the clear text password.
Can't believe I'm typing this, 'Open PowerShell and launch SSH', Microsoft's PowerShell supporting SSH. Hell must have truly frozen over......
Now the shock has passed......
ssh root@172.24.0.1
Password is 'toor'.
cd /usr/local/P4wnP1/helper
./genimg -i -s 1024 -o 1024mb -l sandisk
Disconnect SSH and close PowerShell, we have no further use for it.
Back to aloa's admin page.
Navigate to 'USB Settings'.

Enable 'Mass Storage' and click on the blue arrow.
Select and OK the image file created via ssh.

Ensure the following are enabled:
-
RNDIS
-
Keyboard
-
Custom HID
-
and of course Mass Storage
Click on 'STORE'.

Provide a meaningful name, click 'STORE' again to save changes.

Navigate to 'HIDScript'.
Download this text file and copy into the script pane (here).
If your outside the UK update the keyboard locale to one of the supported br, de, es, fr, gb, it, ru and us keyboards.
Click 'RUN' to test the script.

Its at this point stuff starts going wrong and its due to the keyboard mappings the '|' (pipe) is being written as '¦' (broken bar) and this is throwing a spanner into PowerShell.
The keyboard mappings within aloa look correct and should work, where's the Rubber Ducky........

Glad to report the towel wasn't thrown in or the teddies thrown out.
Encoding PowerShell scripts with Base64 removes the requirements for special characters and allows the script to execute without further issue.
The full script with the encoding section is here.

Its not as simple as pasting the encoded PowerShell in to HIDScript Editor and it will run. The keyboard needs instructions to set the speed, open the Run Command and type text.

The HID Script below will launch PowerShell from the Run Command and inject the encoded PowerShell script.
The encoded Powershell in red is only a small subset of the actual script for demo purposes, please don't copy and paste expecting it to work.
// sets typing speed to "natural" (global effect on all running script jobs)
function natural() {
typingSpeed(100,150) // Wait 100ms between key strokes + an additional random value between 0ms and 150ms (natural)
}
// sets typing speed as fast as possible
function fast() {
typingSpeed(0,0)
}
layout('gb') //set layout gb
press("GUI r") //windows + r
delay(500)
type("powershell\n") //write powershell and press "enter"
delay (1000)
fast()
type("powershell.exe -E DQAKACMAbABvAGcAZwBlAGQAIABvAG4AIAB1AHMAZQByA..............==\n")
type("\n")
type("exit\n")
STORE the resultant script as 'hd_copyMappedData.js'.

Navigate to 'Trigger Actions' and click on 'Add One'.

Complete the new TriggerAction by setting the following:
-
Trigger = USB gadget connection to host
-
Action = Start a HIDScript
-
Script Name = hd_copyMappedData.js
Click Update.

Save the new Trigger Action by click ing 'STORE' and naming 'trig_copy2usb'

Navigate to 'Generic Settings'

Update the 'Master Template Editor' by adding both the 'Trigger Action' and the 'USB Template' previously created.

Save as a new 'Master Template'.

Select the new master template on the 'Startup Settings'.

Shut down the Pi Zero and extract it from the client.
Now when you walk up to any client that's logged on and the user is away making coffee, their data is your data. Plug in the Pi Zero and stand back and admire your work, not forgetting it's the USB Hub on the Pi Zero that is needed.
This was a quick demo and there's plenty of scope for improvements, maybe locking the user's client once the script has finished, you wouldn't want to leave it unattended.......
The next step is to try Empire and other useful scripts, investigate automating Kali to launch Responder on start and capture those password hashes. That's for another time, thanks for reading and hope it proves useful.
