
MDT Installation - Task Sequence and Deployment (Part 8)
Part 1, WDS and DHCP network dependencies for installing Windows systems over the network were installed and configured.
Part 2, MDT, ADK and PE for ADK were downloaded and installed.
Part 3, The service account and share permissions are configured.
Part 4, Custom Settings and Bootstrap.ini are created.
Part 5, Importing OS and Application media.
Part 6, Importing Packages and Drivers.
Part 7, Creating Boot Media.
Finally, the last in the series of articles on how to configure a Microsoft Deployment Toolkit (MDT) server for deploying Windows systems over the network with PXE. Hope its proven useful and any feedback would be appreciated.
An MDT Zero Touch deployment of Windows including Applications, Updates and Office is time-consuming and could take 4 or more hours, this is sub-optimal. Its more efficient to complete all time-consuming aspects with deployment and then capture the end result back to the MDT Server, thus creating a gold or reference image. It's the gold image that is then used as a basis for client deployment from ConfigMgr or MDT. Only the remaining configs like Domain Add or enabling the Unified Write Filter to complete, saving the potential 3 hours per deployment.
All the heavy lifting has been completed, it's just a matter of trying everything together with Task Sequence (TS). The first TS is a light touch, deploying OEM Windows 10 1909, installing Chrome and running Windows Updates, finally capturing the .wim back to the Captures Share. The 2nd TS is a zero touch deploying the previously captured .wim.
The Rules (CustomSettings) will require some minor tweaks to switch from light to zero touch ensuring only the correct steps are presented during the boot process, most can be skipped.
For the Gold Image light touch deployment and capture, right click on the MDT Share, Properties and then the 'Rules' tab, scroll down to '// Wizard Pages. The following are to be set to 'NO', all others to 'YES'.
SkipWizard=NO
SkipCapture=NO
SkipComputerName=NO
SkipTaskSequence=NO
Both the CustomSettings and Bootstrap can be downloaded as text files below, either renamed to .ini and copied directly into the Control folder or copy and past into the Rules and Bootstrap windows. Rename the files so they are not overwritten.

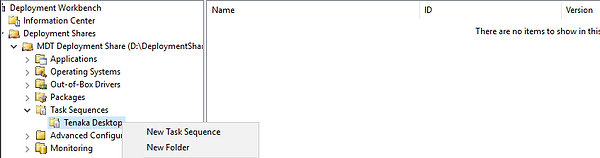
Right click on 'Task Sequence' and create a 'New Folder' for the project or domain, I'll be naming mine 'Tenaka Desktop'.
Right click on the folder and 'New Task Sequence'.
Name the TS ID and TS Name something distinguishable and denotes its for a Gold Capture sequence.

Select 'Standard Client Task Sequence'.

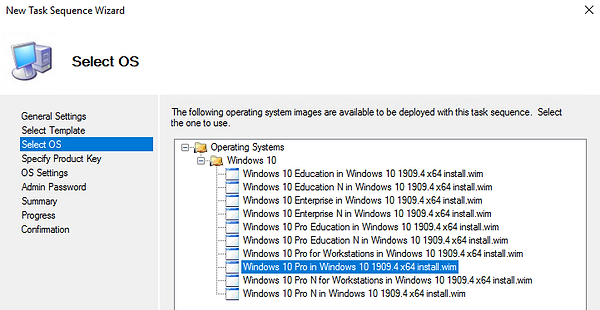
Select an available Windows 10 image.
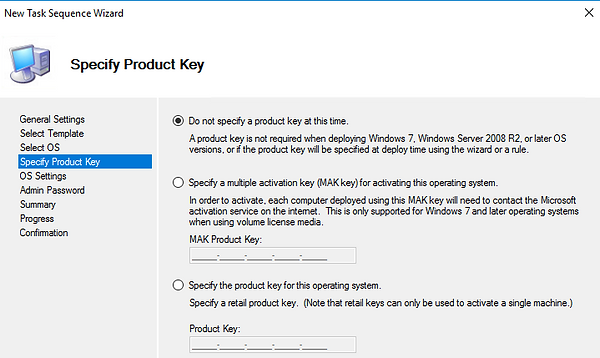
'Do not specify a product key at this time', this is a reference image, its not required.
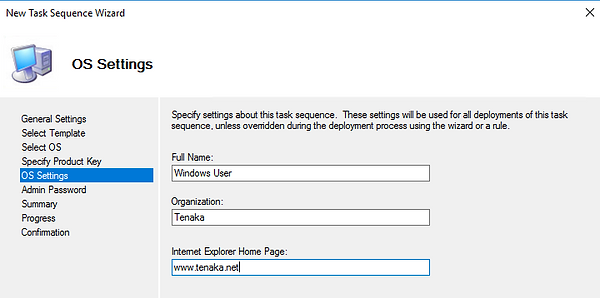
Complete the OS Settings step, quickest is to add a full stop to Organisation field.
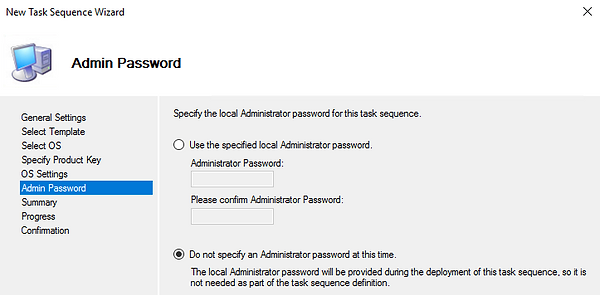
The administrator password is set in the CustomSettings and is not required
Click through the rest of the wizard taking the defaults.
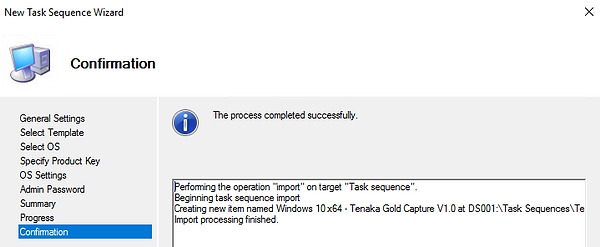
Review 'Confirmation'.
Double click on the new Task Sequence.
Disable the following under 'Preinstall':
Enable Bitlocker (Offline)
Inject Drivers
Apply Patches
Select 'Apply Patches' and click on 'Add', select 'Install Updates Offline'.
Click on the Selection Profile and select 'Servicing Stack - Win 10 x64 1909 - Oct 2020'. The Servicing Stack update will install during the OS installation.

Assuming Internet connection, Windows update will run multiple before and after the applications are installed and that Office is likely to be one of those installed apps.
Navigate to 'State Restore'
Disable:
Recover from Domain
Install Applications
Enable Custom Tasks
Enable Bitlocker
Apply Local GPO Package
Add Folders:
Windows Update
Standard Applications
Move to the 'Windows Update' folders
Windows Update (Pre-Applications)
Windows Update (Post-Applications)
Copy or Add 'Restart Computer' *2 to the Windows Update folder
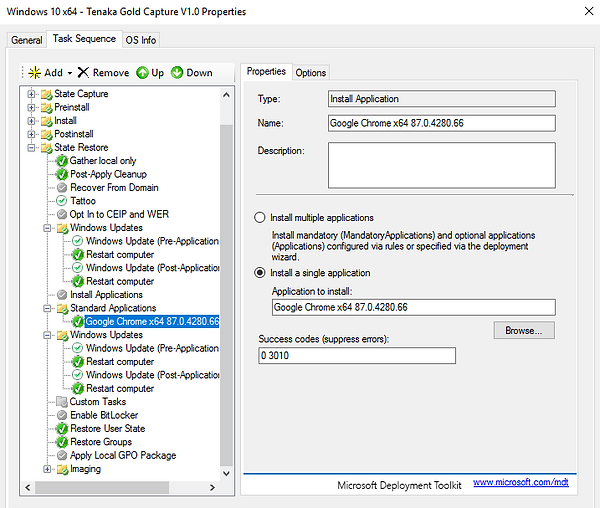
Add 'Google Chrome x64 87.0.4280.66' and any other apps to the 'Standard Applications' folder
Copy the entire 'Windows Update' folder so its after 'Standard Applications'.
Set the virtual machine to PXE and power on.
Standard PXE is initiated by pressing 'F12' at the start of the boot process, this wont be necessary with Hyper-V, but there will be a prompt to press 'Enter'.

The Task Sequence Wizard loads only the selected options from the CustomSettings, some steps may not be immediately visible.
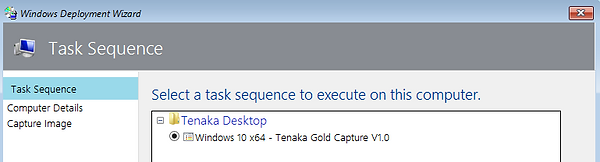
Select the 'Windows 10 x64 - Tenaka Gold Capture v1.0' sequence.
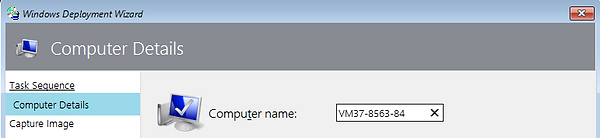
The Computer Name will be pre-populated.
'Computer Details' option should remain enabled as this options does fail, particularly with VMWare and its name formatting.
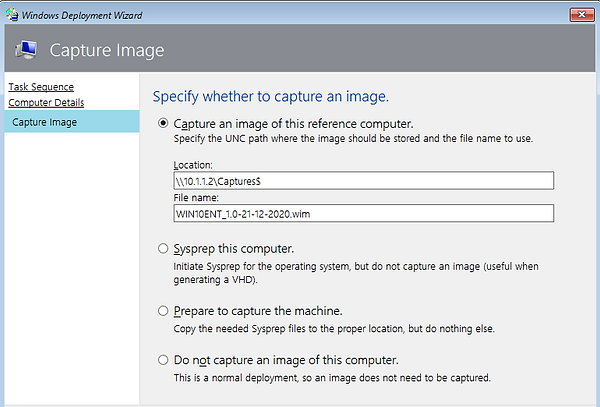
Select 'Capture an Image of this Reference Computer'
The location and file name will be pre-populated, however, the file name can be amended to something different.
Windows 10 with Chrome will now install and the resultant image captured back to the MDT Server.

To check on the progress click on 'Monitoring' and press F5 to refresh.
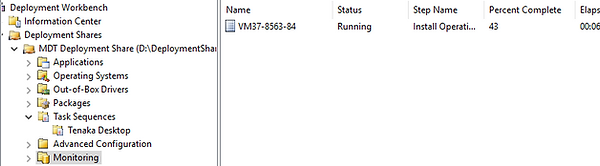
At 100% the image has been captured and waiting in D:\DeploymentShare\Captures.
If the Task Sequence fails during the capture, check the CustomSettings and Share\NTFS permissions of Captures$

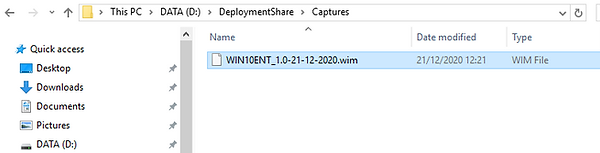
The captured Wim saved to the Captures folder and following the naming configuration set in the CustomSettings.
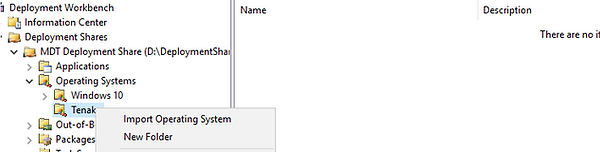
Now the captured Wim needs to be imported back into MDT so its deployable.
Navigate to 'Operating System', create a 'New Folder' and then 'Import Operating System'.
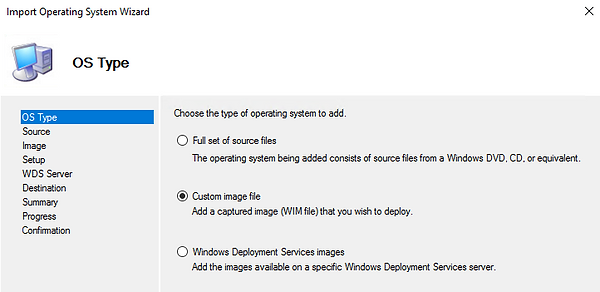
Select 'Custom Image File' this time around.
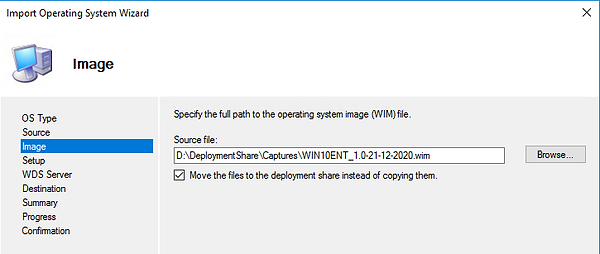
Browse to 'D:\DeploymentShare\Captures\' and select the previously captured wim.
Check the 'Move The files to the Deployment Share instead of copying them'
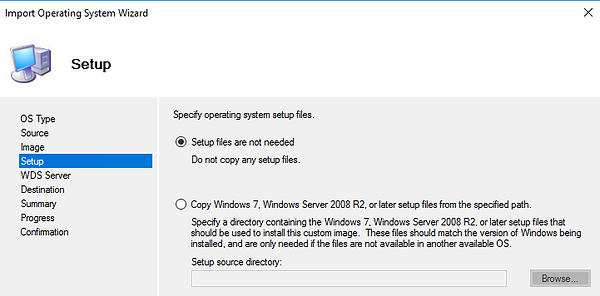
Select 'Setup files are not needed'.
Provide a meaningful name that states its a Gold Image and date created.

Accept the remaining defaults.
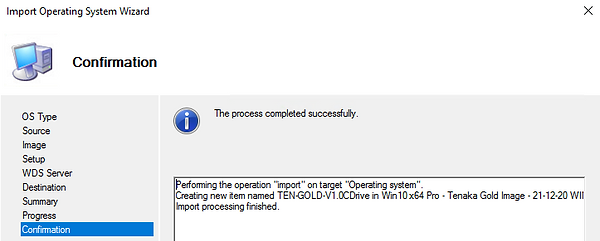
Confirm that the new image has imported successfully, press F5 to refresh if required.

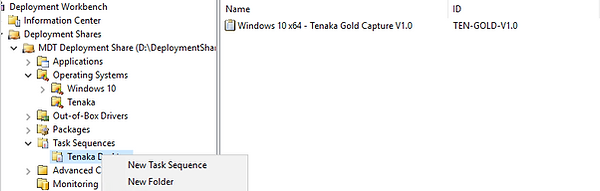
Navigate to 'Task Sequences', select 'Tenaka Desktops' and 'New Task Sequence'.
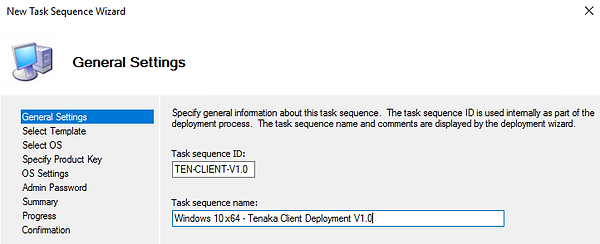
Name the Task Sequence ID something meaningful showing its for Client Deployments.
The Task Sequence Name should also be named denoting its for Client Deployments.
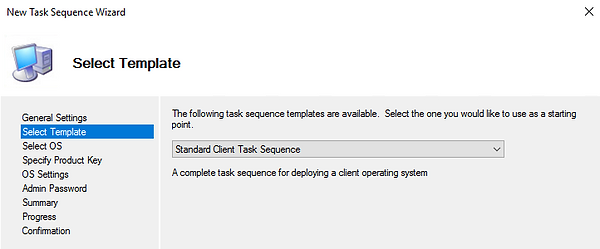
Select 'Standard Client Task Sequence'.
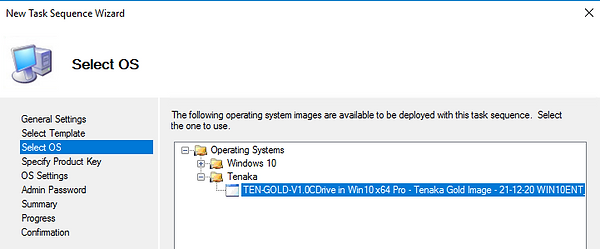
Select the previously captured Gold Image.
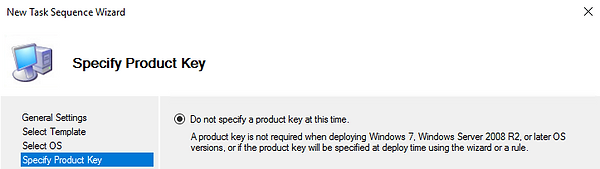
Select 'Do not specify a product key at this time'.
If KMS is available then use one of the following keys (here).
Complete the OS Settings with something meaningful.

Select 'Do not specify an Administrator password at this time', this is set configured in the CustomSettings.

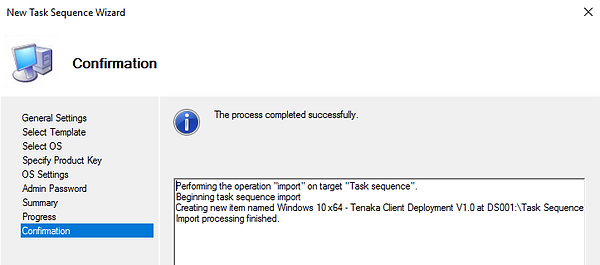
Accept the remaining defaults and complete the wizard.
Right click and 'Properties' on the 'Windows 10 x64 - Tenaka Client Deployment v1.0' Task Sequence.

Disable the following under 'Preinstall':
Enable Bitlocker (Offline)
Inject Drivers
Apply Patches
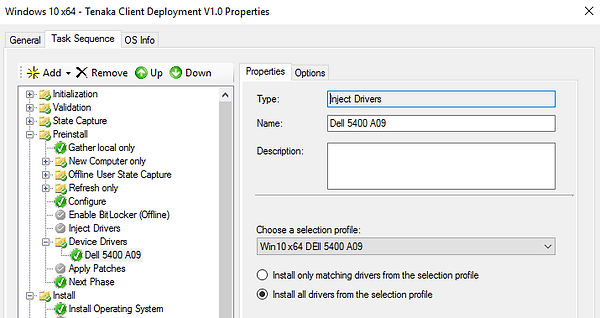
Select 'Inject Drivers' and click on 'Add', select 'Add Group', name the Group 'Device Drivers'
.
Click Device 'Drivers' and 'Add' 'Inject Drivers', name the device driver type and on the 'Selection Profile' and select 'Win 10 x64 Dell 5400 A09'.
Select 'Install all drivers from the selection profile.
To enable the Dell 5400 drivers only install for that model set a WMI Query on the Options tab.
Click on the 'Options' Tab, click on 'Add' and then 'Query WMI'.
Add the following WMI query
Select * from Win32_ComputerSystem WHERE manufacturer LIKE "Dell%" AND Model LIKE "%5400%"
More examples:
select * from win32_Computersystem WHERE Model LIKE "%Model%"
select * from Win32_LogicalDisk WHERE Description = 'Local Fixed Disk'
select caption from Win32_VideoController where caption = “GraphicsCardName”
select caption from Win32_VideoController where caption = “Mobile Intel(R) 4 Series Express Chipset Family”
select * from Win32_VideoController where caption = "Intel(R) HD Graphics Family"
select * from Win32_ComputerSystem WHERE manufacturer LIKE "Dell%" AND (Model LIKE "%820%" OR Model LIKE "%M65%")
select * from Win32_ComputerSystem WHERE NOT Model LIKE "%2530%"
select * from Win32_ComputerSystem WHERE Model LIKE "%Dell%%1950%"

Select 'Install Operating System', at the next Gold Image creation click 'Browse' and select the new image. For now leave the current selected image.

Navigate to 'State Restore'
Disable:
Recover from Domain
Windows Update (Pre-Applications)
Windows Update (Post-Applications)
Install Applications
Enable Custom Tasks
Enable Bitlocker
Apply Local GPO Package
Add Folders:
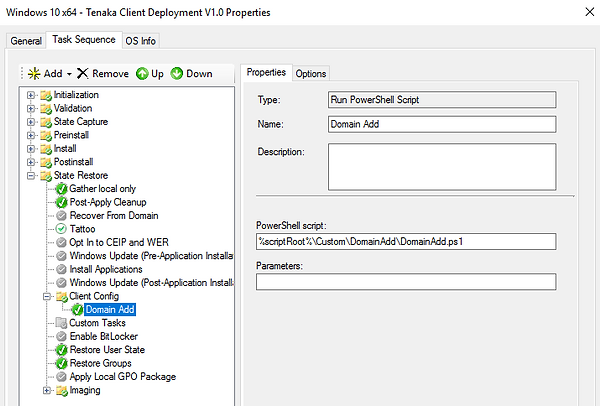
Client Config
Note: Do Not Add the 'Domain Add' step unless a script is at location or the entire deployment will fail, its an example only.
Right click on the MDT Root Share and 'Properties'
Update the 'Rules' aka CustomSettings.ini, set all 'Wizard Pages' to Skip = 'YES'.
Update the 'TaskSequenceID=TEN-CLIENT-V1.0' or to the ID of the Task Sequence for Client Deployments.

Set the virtual machine to PXE and power on.
Standard PXE is initiated by pressing 'F12' at the start of the boot process, this wont be necessary with Hyper-V, but there will be a prompt to press 'Enter'.
Once PXE'd there will be no prompts or wizards and installation of the client build will start immediately.
Use the Monitor to check progress and once to 100%, Windows 10 with Chrome is ready to use.

Now that the deployment of a single Desktop has been tested, there's the potential to deploy hundreds of devices in a few hours. The most I've ever deployed in a single instance is nearly 400 Windows 10 Desktops.
So that's it, these basic steps are enough to get you up and running and deploying Windows over the network. Again thanks for reading and hope its been useful.