
Zero Trust for the Home Lab - IPSec between Windows Domain and Linux using Certs (Part 7)
- Tenaka

- Jul 25, 2025
- 12 min read
Updated: Feb 11
The Road to the World's Most Secure Home Lab: Implementing IPSec Between Windows Domain and Rocky Linux
So far, in the pursuit of the world's most secure home lab, I've implemented several key strategies. Today, I’ll dive into the specifics of implementing IPSec between my Windows Domain and Rocky Linux.
What's Covered in This Blog
This post covers the implementation of IPSec, focusing on the integration between my Windows Domain and Rocky Linux.
What Is Zero Trust - Recap
Zero Trust is a security framework that assumes no user, device, or network segment is inherently trustworthy, regardless of where it sits in the network. The core principles include:
Verify explicitly: Always authenticate and authorize access.
Use least privilege access: Limit access to only what's necessary.
Assume breach: Design as if attackers are already in the network.
IPSec and Its Back Story
If you haven’t already, start with Part 4, where I implement IPSec in a Windows environment using certificates. And yes, you guessed it, there’s more certificate configuration ahead. Wooohoooo, living the dream!
Rocky Linux
Rocky Linux version 10 is today’s Linux OS of choice and will be installed onto a Hyper-V platform. Rocky will serve as a Wazuh monitoring platform as part of the Zero Trust implementation for the home lab. The installation of Wazuh isn’t covered here; it’ll be the focus of the next article.
Microsoft's SCOM might seem like the obvious choice for me, but there’s a longer-term goal to move away from Microsoft. As the company pivots to a Cloud and AI-first strategy, on-prem support and partner benefits are steadily being erased. This shift removes my ability and choice to deploy what and where I want.
PfSense/Managed Switch VLAN
To support the Rocky Linux servers and Wazuh, a new VLAN on the 192.168.90.0/24 subnet will be required. This aligns with the Zero Trust principle of service segregation.
Initially, pfSense is configured to allow unrestricted traffic between VLAN 20, VLAN 30, and VLAN 90 in both directions. Don’t forget to update the managed switch to also allow the new VLAN tag of 90.
A step-by-step guide for setting up VLANs, firewalls, etc., for pfSense is available in Part 2.
IPSec Additional GPO for SSH
An additional GPO exemption allowing SSH (port 22) access between the member server and the Rocky Linux hosts will ease deployment. This allows copy and paste between host and VM.

Current Domain IPSec Settings
Crucial! Windows domain traffic via GPO only supports IKEv1, not that Microsoft will make this obvious or configurable.
Make a note of the current IPSec settings; any deviation will result in IPSec negotiation failure.
The following IPSec settings are known to work reliably. While some configurations using AES-GCM 128 and 256 are supported, AES-GCM 192 is not supported on Rocky Linux. If you plan to deviate from this setup, be sure to confirm that your chosen ciphers are supported on both Windows and Linux.
A step-by-step guide for setting up IPSec in a Windows Domain is available in Part 4. I strongly recommend following that guide before attempting to add Linux to the mix.
IPSec Settings in GPO - Just for Info
Open GPO Management and navigate to the IPSec policies and edit:
Computer Configuration > Policies > Windows Settings > Security Settings
Right-click and select Properties on Windows Defender firewall and Advanced Security.
Select the IPSec Settings tab.

Open Main Mode's Customize...
Select and edit the SHA384 integrity policy.
Make a note of all the settings.

Audit Quick Mode.
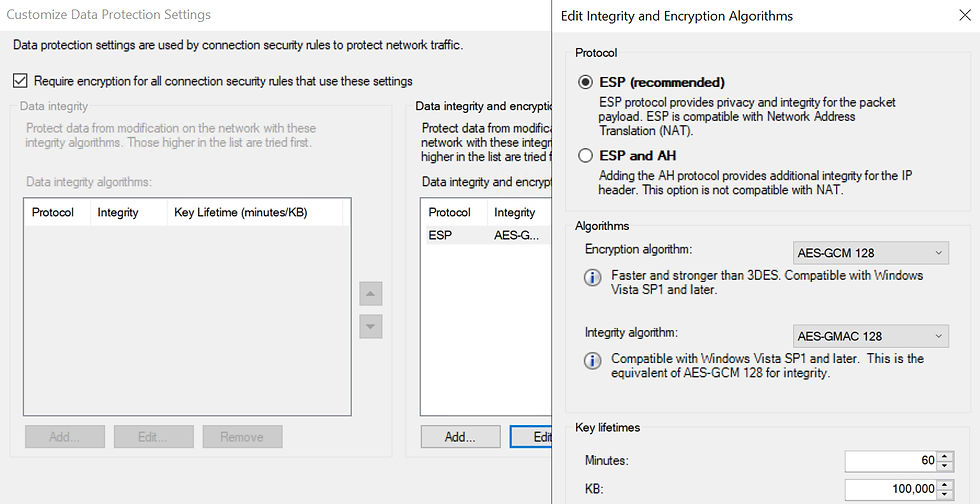
Audit Authentication, which is using the Trusted Root certificate.

DNS
Create a host record for the intended Rocky host.

Linux Packages for IPSec
The latest release of Rocky Linux is installed as a Hyper-V VM, with 6GB RAM and 250GB disk. Finally, the virtual NIC is set for VLAN 90.
During installation, disable the root account and ensure that the user you create is added to the wheel group to grant administrative (sudo) privileges.
Connection from Server
Once Rocky is properly installed, pfSense should assign it an IP address via DHCP. In my case, it was 192.168.90.100.
Here’s the command to set a static IP, gateway, and DNS.
SSH from PowerShell
I’ll be connecting from my Windows server with PowerShell—no more Putty for me!

Hostname
Update the hostname to match the DNS entry created earlier.
Updates
Start where you mean to finish. Apply any updates to ensure stability and security fixes are applied.
AD Packages
Install the packages that will allow Rocky to be a domain member.
Strongswan
Install the following two packages in order.
Time and Timezone
Rocky will source its time from the DCs, not only to support authentication protocols but also to ensure that log timestamps are accurate and consistent across the environment.
Search for your locale; mine's London. Copy the result and then set the timezone. Enable and start the time sync service.
Update `chrony.conf` with the following, so it points at the DCs:
`server 192.168.20.245 iburst`
`server 192.168.20.247 iburst`
`server 192.168.90.249 iburst`

Restart the time service.
Run the following commands once IPSec is implemented to confirm time and time sync.
AD or Not to AD
This step is included in case Rocky needs to join the domain. However, for its intended role as a monitoring solution, it’s best to minimize open ports and limit connectivity between it and the domain to reduce the attack surface.
To Join the Domain
In Active Directory Users and Computers, pre-create the computer object `wazuh90` in the required OU. If you don't do this step, Rocky will be added to the AD Computer container.
Discover your domain (use your actual domain name in ALL CAPS).
Join the domain using an account with permissions.
Pull password information for an Active Directory user.
Pull some domain info.
IPSec Certificate for Linux Preparation
Advanced certificate requests using version 3 templates are not supported through the traditional web enrollment interface (certsrv) unless you're using legacy systems like Windows XP or Server 2003. Clients running Windows Vista or newer cannot request v3 template certificates via this method due to compatibility limitations.
Microsoft’s recommended approach for handling version 3 templates is to use Certificate Enrollment Web Services (CEP/CES) or leverage Autoenrollment via Group Policy. Both support modern certificate features and provide a more secure and scalable enrollment process.
I’m not deploying a CES server; that's for another day and another blog, and it’s unnecessary for our needs. CES is mainly used by Windows clients for advanced certificate enrollment. Linux doesn’t require it, since it still supports the legacy method.
New Linux Certificate Template
Let's prep a certificate. Open the CA management snap-in, and then right-click on Certificate Templates and Manage.
Duplicate a Certificate Template
Either duplicate the IPSec (Offline) certificate or the previously created 'Non-TPM' template for server or workstation.

General Tab:
Set the validity period to 1 year.

Compatibility Tab:
Set both Compatibility settings to Windows 2003. Failure to do this will mean the template won't be available in the certificate web console.

Request Handling Tab:
Allow the private key to be exported.

Cryptography Tab:
Set the Algorithm to Determined by CSP and key size to 2048.

Subject Name Tab:
Set to Supply in the request.

Extensions Tab:
Edit the Application Policies and add in:
- Client Authentication
- IP Security IKE Intermediate
- IP Security Tunnel Termination
- IP Security User
- Server Authentication

Security Tab:
Add the user or group that will perform the certificate enrollment.
Remove any group that auto-enrolls.
Publish the Certificate Template
Return to the main CA Management snap-in.
Right-click on Certificate Templates.
Select New > Certificate Template to Issue > select Toyo Linux IPSec.
Certificate Enrollment
In this section, we’ll walk you through the process of requesting a certificate for a Linux system using the Windows CA web interface.
SSH onto Rocky.
Private Key
A private key is generated locally to ensure it never leaves the system. A CSR is then created using that key to securely request a certificate from the CA without exposing the key itself.
Create a working directory.
Create a private key that remains on the host; I'll secure it shortly.
Create CSR
Create a CSR derived from the Private key.
Update the following with the FQDN of the Rocky host.
Copy and paste into the SSH sessions.
Cat the CSR, select all the text including the Begin and End Certificate Requests lines, and press Enter to copy to the Windows clipboard.

Cert Request from CA Web Console
The CSR needs to be copied to the CA Web console to complete the certificate enrolment.
From the Windows Server, open a browser and enter the address to the CA Web server, e.g., https://certs.toyo.loc/certsrv.
Select Request a certificate.

Select Submit a Certificate request by using a base-64-encoded CMC.

Paste the CSR into the Base-64-encoded window.
Select the Toyo Linux IPSec template.

Select Base 64 encoded.
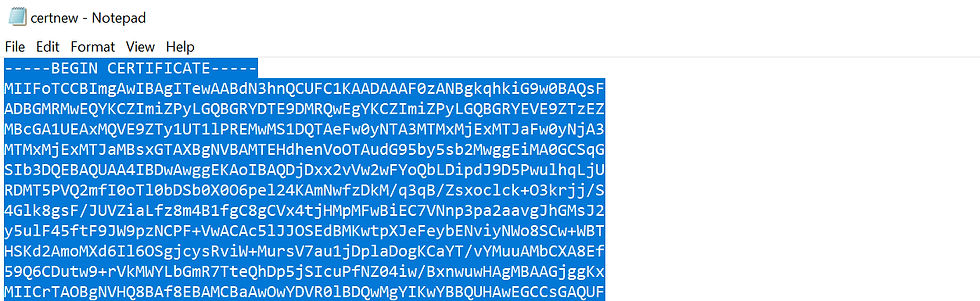
Click on Download certificate.

Open the downloaded certificate with Notepad.

Copy the entire contents to clipboard.
Create the Certificate
Return to the SSH session. From this point onwards, every command will require sudo.
`sudo nano FQDN.crt` and paste the contents of the Windows clipboard.

Ctrl + O to output the contents to file.
Ctrl + X to exit Nano.
Copy the Private Key and Certificate to Strongswan
The private key and the certificate are required to be copied or moved to the strongswan directory and configured with the correct permissions.
Copy the Private key.
Set the private key to be readable and writable only by the file's owner.
Set Root as the Owner.
Repeat the steps to secure the private key in the home directory.
Copy the certificate to the strongswan x509 directory.
Set the certificate permissions so the owner can write and everyone else can read.
Trusted Root CA
The root CA certificate is required on the local host to establish trust in certificates issued by that authority. Without it, the system cannot validate or trust incoming connections or services secured with those certificates.
In the CA web console, click the Home link, then select Download a CA certificate, certificate chain, or CRL.
Select Base 64 and then Download CA Certificate.

Open with Notepad and copy the contents.

Ensure you're in the 'certs' working directory.
Open nano and paste the Base64-encoded root certificate from your clipboard into the file.
Ctrl + O to output the contents to file.
Ctrl + X to exit Nano.
Root Trust
Copy the root CA certificate to the trusted anchors directory so the system recognizes it as a valid certificate authority.
Copy the root CA to anchors so the browser trusts sites on my domain.
Refresh the system’s trusted certificate store with the new certificate.
Copy the root CA to the Strongswan x509CA directory.
Set the certificate permissions so the owner can write and everyone else can read.
Firewalls
The following commands permanently open the required ports and protocols for IPSec traffic. Note that port 4500 and the AH protocol are not needed for non-VPN traffic or this specific configuration.
sudo firewall-cmd --list-all
sudo firewall-cmd --permanent --add-port=500/udp
sudo firewall-cmd --permanent --add-protocol=esp
sudo firewall-cmd --permanent --add-port=4500/udp
sudo firewall-cmd --permanent --add-protocol=ah
sudo firewall-cmd --reload
Swanctl.conf and Not Strongswan
StrongSwan is an open-source implementation of the IPSec protocol suite, used to establish secure, encrypted connections between hosts or networks. It uses IKE (Internet Key Exchange), typically IKEv2, to negotiate and manage security associations. Naturally, Microsoft only supports IKEv2 for VPNs, so we're stuck with IKEv1.
Configuration is handled through `swanctl.conf`, and the `swanctl` utility is used to load, manage, and monitor IPSec connections in real-time. It supports certificates, EAP, and various authentication methods, making it ideal for inter-domain and subnet traffic, site-to-site, and remote access VPNs.
`Swanctl` is to be used as the IPsec command is deprecated. `swanctl.conf` provides a more modular, flexible, and systemd-friendly way to manage StrongSwan.
Backup the original `swanctl.conf`.
Create a new `swanctl.conf` with nano.
Download my swanctl.conf from Github and paste it into nano.

Crucial! Update the highlighted values to exactly match your Windows domain. They’re explicit, and any mismatch will prevent the IPSec tunnel from negotiating:
aes256-sha384-ecp384 = Key Exchange (Main Mode)
Integrity algorithm - SHA384
Encryption algorithm - AES-CBC 256
Key exchange algorithm - EC DH P-384
esp_proposals = aes128gcm128 = Data Protection (Quick Mode)
Encryption algorithm - AES-GCM 128
Integrity algorithm - AES-GMAC\GCM 128
In transport mode, only traffic that matches `local_ts` and `remote_ts` will be protected by IPSec. Any traffic not matching these rules will pass as normal, unencrypted traffic.
Ctrl + O to output the contents to file.
Ctrl + X to exit Nano.
Instruct the Charon daemon to load plugins dynamically, making the setup more flexible and easier to manage across different use cases.
Start Strongswan Service
Up to this point, access to Rocky has primarily been from Windows via SSH. The upcoming steps may terminate your session, and any misconfiguration will terminate the connection. With that in mind, you may want to switch to direct console access before proceeding.
Note: Ignore any errors or warnings for the sqlite plugin; it’s harmless noise.
Remove the SSH Exemption in GPO
The IPSec GPO exemption for SSH, between the Windows Server and Rocky.
Enable and Start Strongswan
Execute the following commands. Any misconfigurations, typos, or incorrect parameters with `swanctl.conf` will likely prevent the service from starting or successfully establishing an IPSec connection.
Enable Strongswan service.
Start Strongswan service.
Load all parameters stored in the `swanctl.conf` file.
Status of Strongswan
Let’s go through a few configuration steps to verify that IPSec is running correctly and establishing a successful connection to the Windows endpoint.
`swanctl.conf` does not allow exemptions and communicates exclusively over IPSec with Windows. So, I found that using `nslookup` is a better way to test the initial connection with Windows domain controllers.

Check the status of the Strongswan service to ensure it is running and enabled.

I prefer retrieving a backdated list of events, so I use the `-n` option. This is particularly useful when troubleshooting issues where viewing only the latest events might miss the critical error that triggered the problem.
`journalctl -u strongswan -f` displays StrongSwan events in real-time as they occur.

`sudo swanctl --list-conns` displays all configured IPSec connections from the `swanctl.conf` file, including their settings and current status.

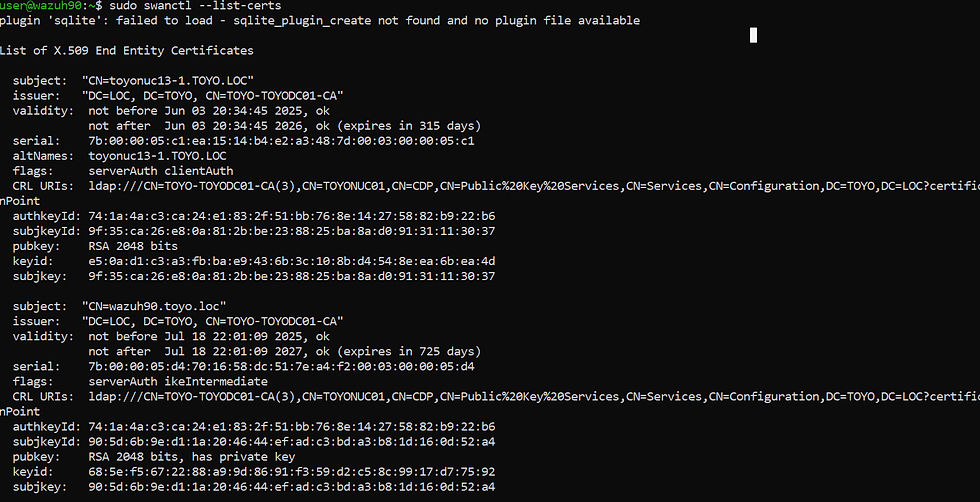
`sudo swanctl --list-certs` lists all loaded X.509 certificates, showing details like subject, issuer, validity period, and key usage.
`sudo tcpdump -n esp or udp port 500` captures and displays network packets that are either ESP (IPsec encrypted) traffic or use UDP port 500, which is commonly used for IKE (Internet Key Exchange) in IPSec.

Finally, let’s examine the Windows side of the IPSec connection. Open `wf.msc` and navigate to either the Main Mode or Quick Mode section. There, you should see the IPSec connection established between Rocky Linux and the Windows Server.

It Never Works First Time....
Windows Firewall
From my experience, the following `journalctl` messages usually mean that IKE or ESP traffic is being blocked by a firewall, either on the Windows endpoint or by pfSense. If there are no matching log entries on the Windows server, I take it as a sign that the packets never made it through. In that case, I’ll enable or check the firewall logs on pfSense to confirm if it’s dropping the traffic.
journalctl -u strongswan -n 50wazuh90.toyo.loc charon-systemd[8207]: sending packet: from 192.168.90.100[500] to 192.168.30.61[500] (180 bytes)
wazuh90.toyo.loc charon-systemd[8207]: creating delete job for CHILD_SA ESP/0x00000000/192.168.20.245
wazuh90.toyo.loc charon-systemd[8207]: CHILD_SA ESP/0x00000000/192.168.20.245 not found for delete
wazuh90.toyo.loc charon-systemd[8207]: giving up after 5 retransmits
wazuh90.toyo.loc charon-systemd[8207]: establishing IKE_SA failed, peer not responding
wazuh90.toyo.loc charon-systemd[8207]: creating acquire job for policy 192.168.90.100/32[udp/35655] === 192.168.20.245/32[udp/domain] with reqid {2}
wazuh90.toyo.loc charon-systemd[8207]: initiating Main Mode IKE_SA windows-ipsec[1317] to 192.168.20.245
wazuh90.toyo.loc charon-systemd[8207]: generating ID_PROT request 0 [ SA V V V V V ]
wazuh90.toyo.loc charon-systemd[8207]: sending packet: from 192.168.90.100[500] to 192.168.20.245[500] (180 bytes)
wazuh90.toyo.loc charon-systemd[8207]: creating delete job for CHILD_SA ESP/0x00000000/192.168.20.247
wazuh90.toyo.loc charon-systemd[8207]: CHILD_SA ESP/0x00000000/192.168.20.247 not found for delete
wazuh90.toyo.loc charon-systemd[8207]: giving up after 5 retransmits
Syntax with swanctl.conf
The first three log extracts show that the `swanctl.conf` file is misconfigured, either due to a typo or something in the syntax being incorrect. Starting the service immediately fails with an exit code, which usually points to a parsing error or a missing/invalid configuration directive.
sudo systemctl start strongswan.serviceJob for strongswan.service failed because the control process exited with error code.
See "systemctl status strongswan.service" and "journalctl -xeu strongswan.service" for details.
Running `sudo swanctl --load-all` gives the same result, confirming that the daemon can’t even load the connection definitions.
sudo swanctl --load-allJob for strongswan.service failed because the control process exited with error code.
See "systemctl status strongswan.service" and "journalctl -xeu strongswan.service" for details.
Checking `journalctl -u strongswan -n 50` reveals that `charon-systemd` is shutting down with `status=22`, which typically means there’s a configuration error (e.g., invalid parameters, wrong file paths for certificates, or unsupported options).
journalctl -u strongswan -n 50wazuh90.toyo.loc systemd[1]: strongswan.service: Control process exited, code=exited, status=22/n/a
wazuh90.toyo.loc charon-systemd[2882]: SIGTERM received, shutting down
wazuh90.toyo.loc systemd[1]: strongswan.service: Failed with result 'exit-code'.
wazuh90.toyo.loc systemd[1]: Failed to start strongswan.service - strongSwan IPsec IKEv1/IKEv2 daemon using swanctl.
The final log extract, however, tells a slightly different story. Here, I can see the IKE negotiation starting, but it’s failing with “header verification failed.” This points to either an IKE proposal mismatch (e.g., incorrect algorithms or key sizes), a certificate identity issue, or even corrupted packets caused by a misbehaving firewall/NAT device.
journalctl -u strongswan -n 50wazuh90.toyo.loc charon-systemd[22855]: 192.168.20.247 is initiating a Main Mode IKE_SA
wazuh90.toyo.loc charon-systemd[22855]: selected proposal: IKE:AES_CBC_256/HMAC_SHA2_384_192/PRF_HMAC_SHA2_384/ECP_384
wazuh90.toyo.loc charon-systemd[22855]: generating ID_PROT response 0 [ SA V V V V ]
wazuh90.toyo.loc charon-systemd[22855]: sending packet: from 192.168.90.100[500] to 192.168.20.247[500] (160 bytes)
wazuh90.toyo.loc charon-systemd[22855]: header verification failed
wazuh90.toyo.loc charon-systemd[22855]: received invalid IKE header from 192.168.20.247 - ignored
Thanks for Your Time and Support...
Another IPSec and certificate-based blog wrapped up, and just one more to go before my home lab’s Zero Trust panacea of perfection is fully implemented.
Honestly, I loved working on this one. My first Linux IPSec deployment in prepping for this blog was Linux-to-Linux, and it was smooth, stable, and just worked. Then I brought Windows into the mix… and suddenly I was questioning my life choices and the tech I’ve devoted my time to. Back in the Vista days, when I was running 100% OpenSuse, I really should have stayed the course.
Related Posts:
Part 1 - Zero Trust Introduction
Part 3 - pfSense and 802.1x
Part 4 - IPSec for the Windows Domain

Comments